KOJIE Visual Agent Builder
Build powerful AI agents in minutes with drag-and-drop simplicity
Build Enterprise AI Workflows
Start with a template, or drag AI models from the sidebar to create custom workflows
Component Library
Drag & DropStep-by-Step Visual Agent Builder Guide
Master the neural workspace in 5 simple steps
Select Your AI Components
What to do: Browse the left component panel and find the AI agents you need.
What you'll see: Components organized by category (AI Agents, Data Tools, Logic, etc.)
Example Components:
- 📝 GPT-5 Text Generator - For content creation
- 🧠 Claude-4 Analyzer - For data analysis
- 💎 Gemini Vision - For image processing
- 📊 Data Processor - For data transformation
Tip: Hover over components to see their description and capabilities
Drag Components to Canvas
What to do: Click and drag your chosen components into the neural workspace canvas.
What you'll see: A glowing drop zone with neural grid that pulses when you hover over it
Expected Experience:
- ✨ Drag Start: Component glows and follows your cursor
- 🧠 Hover Canvas: "NEURAL WORKSPACE" pulses with cyan/green effects
- ⚡ Drop Success: Component appears with connection points and glow effects
- 🎯 Grid Snap: Component automatically aligns to the neural grid
Tip: The canvas will show "Drop Zone" indicators and expand when you approach with a component
Connect Your Workflow
What to do: Click and drag from output points (right side) to input points (left side) of other components.
What you'll see: Connection points that glow and expand when you hover over them
Connection Process:
- 🔵 Output Point: Blue circle on the right side of components
- 🟢 Input Point: Green circle on the left side of components
- ⚡ Connection Line: Animated curve that flows between connected points
- 🎨 Visual Feedback: Lines glow with neural energy when data flows through
Sample Workflow:
Real Workflow Output Example:
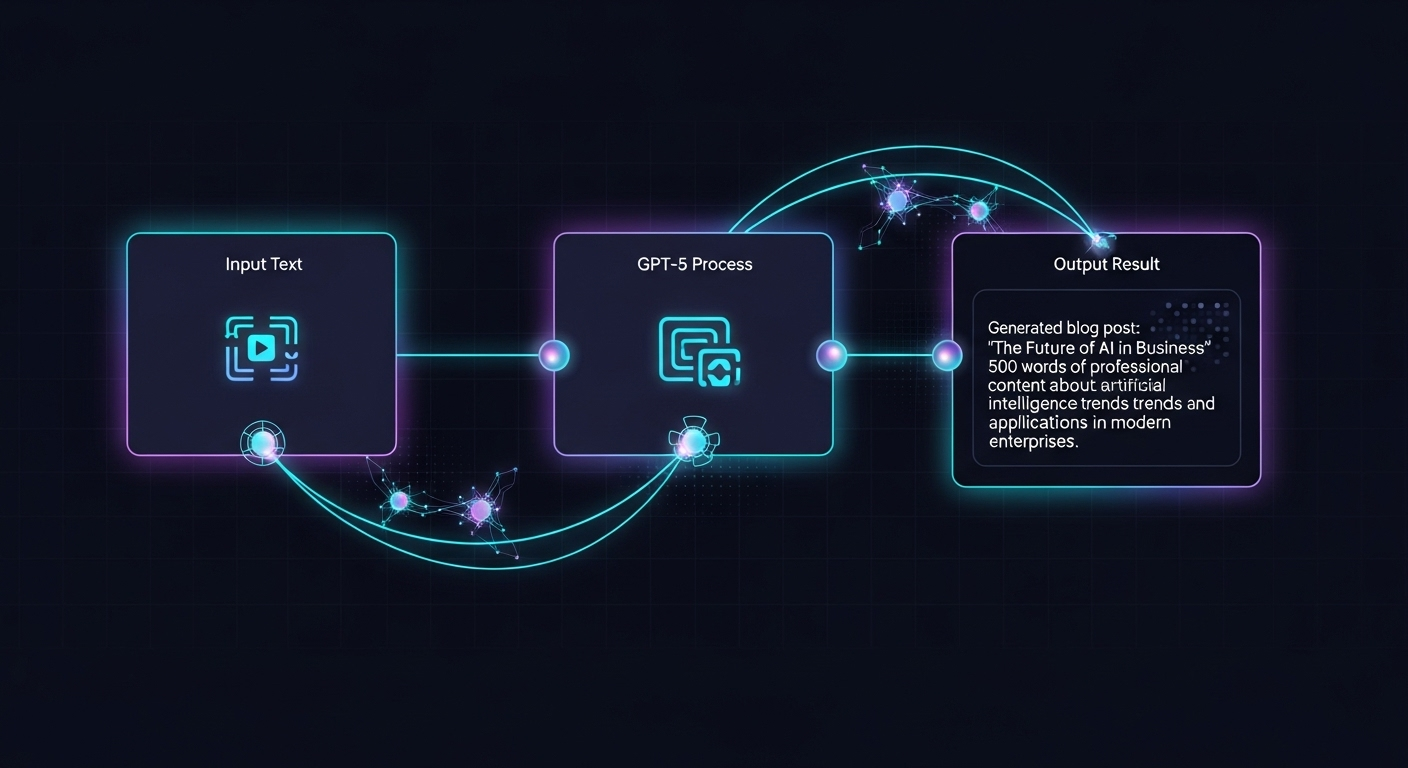
This is what your completed workflow looks like with real AI processing results
Tip: Invalid connections will show red warning indicators
Configure Component Properties
What to do: Click on any component to see its properties in the right panel.
What you'll see: A detailed properties panel with all configurable options
Typical Properties:
- 🔧 Model Settings: Choose GPT-5, Claude-4, Gemini, etc.
- ⚙️ Parameters: Temperature, max tokens, system prompts
- 📋 Input/Output: Data format and validation rules
- 🎯 Behavior: Retry logic, error handling, timeouts
GPT-5 Configuration Example:
Tip: Properties automatically save as you type
Test & Deploy Your Agent
What to do: Use the toolbar buttons to test your workflow and deploy it.
What you'll see: Real-time execution with visual feedback and results
Available Actions:
- ▶️ Run Flow: Execute your workflow with test data
- 💾 Save Flow: Store your workflow for later use
- 🚀 Deploy Agent: Make your agent live and accessible
- 📝 Generate Code: Export as Python/JavaScript code
What Happens When You Run:
Tip: Watch components glow with neural energy as your agent processes data
Popular Workflow Examples
🧠 Content Generator
Input Topic → GPT-5 Generate → Format Output → Save Content
📊 Data Analyzer
Upload Data → Claude-4 Analysis → Gemini Visualization → Export Report
🎨 Creative Assistant
User Input → GPT-5 Ideas → Gemini 3 Images → Combine & Present
🔍 Research Agent
Query → Perplexity Search → Summarize → Generate Insights
Pro Tips for Success
Plan Your Flow
Start with the end goal and work backwards to create efficient workflows
Test Early & Often
Use the Run Flow button frequently to catch issues before deployment
Optimize Settings
Fine-tune model parameters for better performance and cost efficiency
Use Error Handling
Add fallback nodes to handle failures gracefully in production